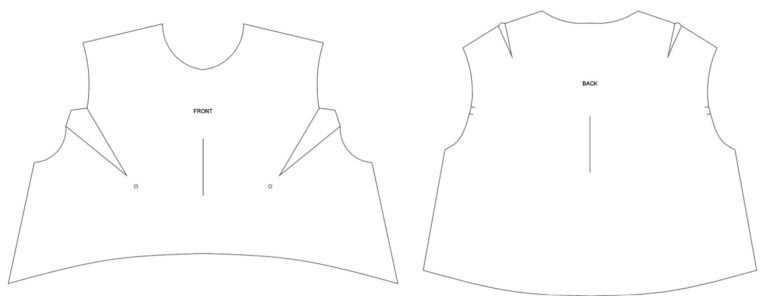
If you’re not familiar with the technique known as “slash and spread,” you’re in for a valuable tip! As a sewing enthusiast, I’ve always been intrigued by the idea of using one pattern that fits well and adjusting it to create different styles. To approach this, I would start with a basic bodice pattern like a sleeveless blouse pattern with a straight body, crew neckline that would allow it to fit over my head and bust darts. To modify the pattern, I would shift the bust darts from the side seams to the armholes, increase the fullness at the hem to create a looser fit, and add a slightly curved hemline for a touch of style. There is a multitude of design variations one could do with a pattern piece like this.
To create this pattern, I followed the steps outlined below.
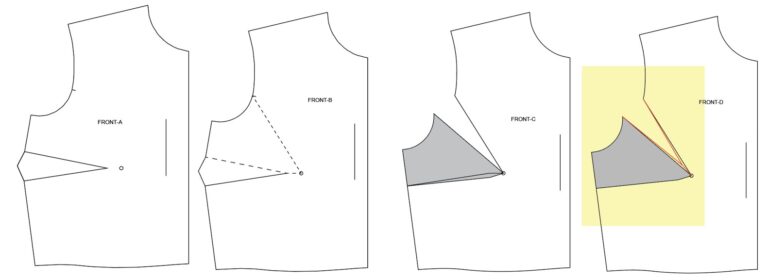
A.Begin by selecting the front bodice pattern piece.
B.Draw a line from the dart point to (bust point if not indicated) a desired location in the armhole. Then cut along the upper dart line (dashed line to the bust point, then cut along the dashed new dart leg from the armhole to the bust point. Leaving about a 1/8-to-1/16-inch hinge.
C.Rotate the triangular section (the grayed area in the diagram) downward, aligning the dashed dart line with the opposite solid dart line. Tape the two together. This adjustment will keep your bust point in place, as indicated by the small circle in the diagram. You now have a new dart opening extending from the bust point to the armhole.
D.Place a piece of paper behind the new dart opening (refer to the yellow area in the diagram). Tape the paper to the pattern piece and draw a line extending out 1/2 inch from the bust point (as shown by the circle in the diagram) between the two cut lines of the new armhole dart section. Next, draw a line from the lower armhole cut edge to the new 1/2-inch point, then back to the opposite upper cut edge of the armhole (as indicated by the red lines in the diagram).
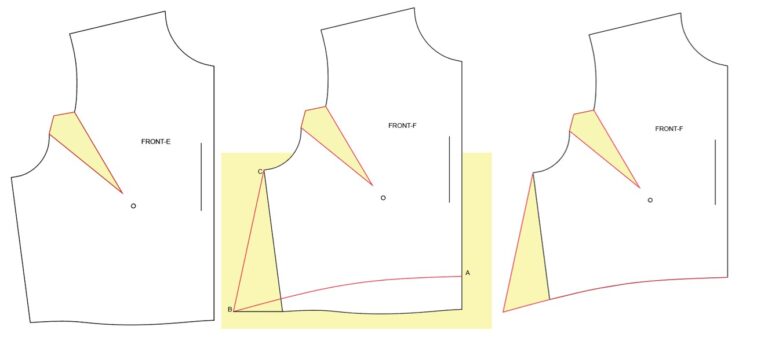
E.Fold the pattern piece in half along the center armhole dart opening to determine the outer cut edge. Then trace along the outer cut edges following the curve of the armhole. Open the pattern piece out flat again and trim away any excess paper.
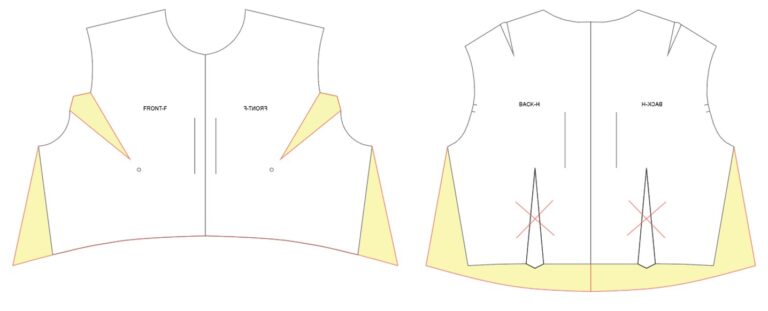
F.Place a piece of paper behind the pattern piece to extend beyond the side seam and hemline, and tape it in place. Measure up 1 inch (or your preferred amount) from the hemline along the center front line to point “A.” Then, draw a line 2 inches (or your preferred amount) outward from the side seam to point “B.” From point “A,” draw a curved line to point “B,” and then draw a straight line to point “C” (as diagram shows in red lines). Cut away the excess paper outside of the red lines. This completes the half section of your front pattern piece.
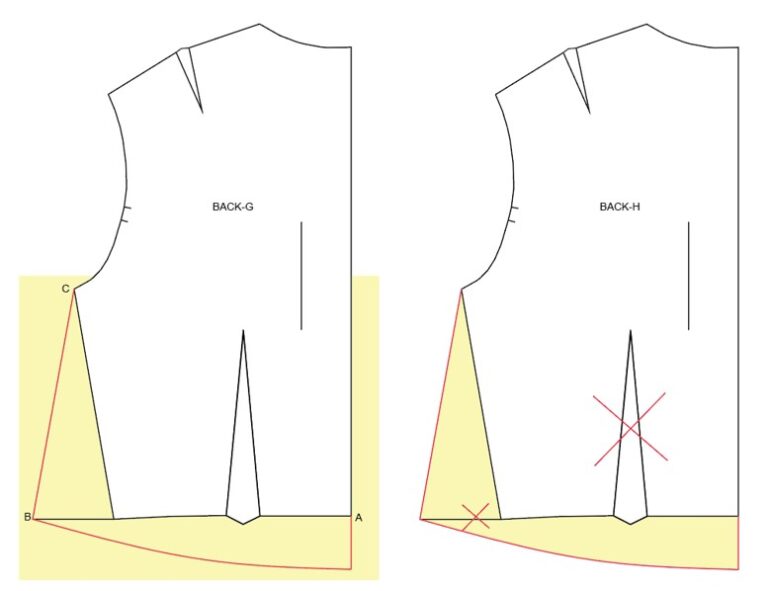
G.Place A. Place a piece of paper behind the back pattern piece, extending beyond the side seam and below the hemline. From the center back hem (point A), draw a line 1 inch (or your preferred amount) down. Then, from the side seam/hem point (point B), draw a line outward by 2 inches (or your preferred width). From point A, draw a curved line to point B, then draw a straight line up to point C.
H.Cut away the excess paper outside the red lines and disregard the lower dart and the extended line from the side seam. You have now completed the half section of your back pattern piece.
To finish your front and back half pattern pieces sections, mirror each piece along the center lines. This will give you full Front and Back pattern pieces to work with, should you prefer not to cut on the fold of your fabric. I hope you found this tip helpful—happy patterning! 😊
Mirrored Front & Back Pattern Pieces - Add seam allowance and ready to sew
For more pattern drafting techniques join APM’s Patreon community and get your updates by email as they come out live.
Traci (Owner & Patternmaker of APM) also offers one-on-one, small-group lessons along with bi-monthly patterning techniques over Zoom. Read more below for details here for your next steps on enhancing your patterning skills today.