DIY Patternmaking Mentoring Challenges
Patternmaking Mentoring for DIY Facebook Group
List of Challenges
Challenge:
[sta_anchor id=”1 Transfer Darted Slopers to Non-Darted Slopers”]
Challenge 1:
Transfer darted slopers to non-darted slopers.
- Purchase APM’s mini basic waist dart bodices & sleeve slopers or use your own. *I like to have my students work on quarter scale slopers so they do not have to use so much paper and time to practice the techniques. Then once they understand technique they can apply it to a full scale sloper or pattern. Mini Slopers for Purchase
- Once you follow steps to practice challenge, take a picture of your front & back sloper when done and share with group in the DIY Challege Allum for group to share feedback or ask group more questions.
- Start challenge #1…
- Start by purchasing your downloadable mini slopers from attached link above or use your own.
- First step is to trace front & back bodice slopers onto paper. No need to use sleeve sloper on this challenge.
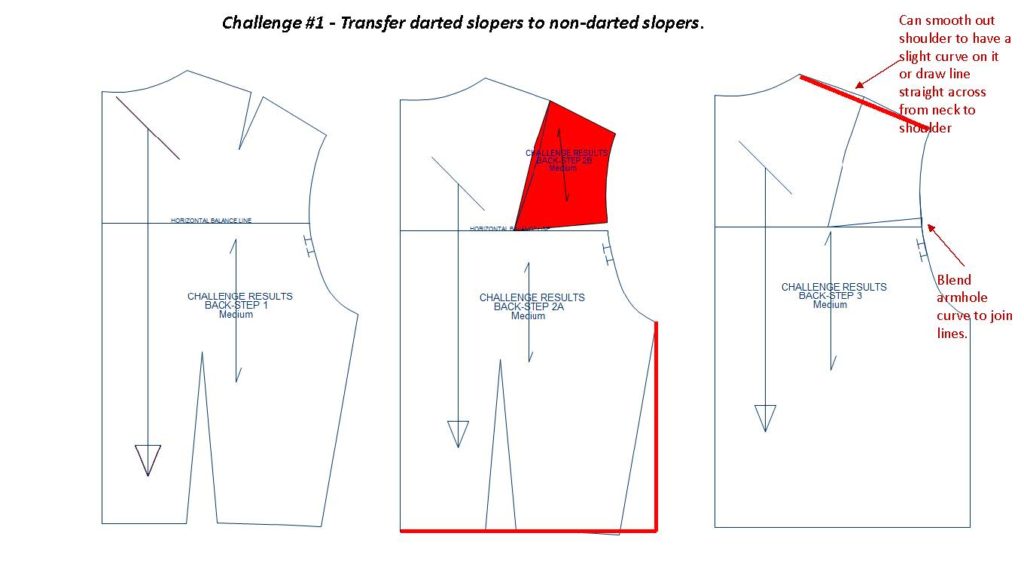
- This is very basic and simple process where you will ignore the waist dart on the front & back bodice by drawing a line from the underarm point straight down (parallel to CF “center front” or CB “center back”). Then draw a right angle from CF waist and CB waist point through side seam you just drew down from underarm. You will now have a front bodice that has no waist dart (basically your just ignoring the dart in a sense).
- The back bodice waist dart you will do the same process as the front. If you want to remove the shoulder dart on the back bodice, draw a line at about your mid armhole to your CB perpendicular to your CB (this will be your HBL or horizontal balance line). Then draw a line extending you shoulder dart leg down to this new HBL line.
- Next cut along the dart leg line just drawn down to HBL. Then cut along the HBL line from your mid armhole to the dart leg line extended, making sure to leave a hinge where the two cut lines merge. Then rotate the triangle piece between cut lines towards your shoulder to close off shoulder dart. Move just enough that you close the dart leg opening only. You will now have a dart opening at your mid armhole. Next you will want to tape the rotated piece in place so shoulder dart reminds closed. Add a blank piece of paper behind your armhole where the dart opening has moved to so you can close that space. *We now will ignore that open dart space on armhole. By blending your armhole lines together to join the curved line above and below opening.
- You should now have a basic front & back sloper with no darts.
References….For more info or visual step-by-step examples check out APM’s online course below for removing shoulder dart (mini slopers included in course). And learn additional dart transferring techniques using the slash/spread & pivot transfer methods. Plus be sure to check out the free video on how to make sure your lining up your seams properly after altering pattern peices too! Have fun and happy patterning! 🙂
http://apparel-pattern-making.teachable.com/p/beginning-pattern-making
Video Demos
Thank you to all who participated in challenge #1. Please refer to challenge album or link for feedback on how slopers should look after following drafting steps.
Please note…pattern drafting is a process, so these are example of techniques that can be applied. Example steps do not guarantee they will fix or adjust your pattern so it fits correctly for you. The best way to fit your pattern is to sew up test garments to check your patterning and then make updates to pattern pieces pending how fabric is fitting your body. Keep up the great work and just remember, pattern drafting just takes time to improve. Its like riding a bike, the more you do and practice the better you get! Happy patterning all!
ANSWER TO CHALLANGE #1 BELOW: